Wednesday, November 23, 2011

Krantz (yeast cake) with Nutella and Halva filling (with GF option)

This is a Krantz, which is a braided yeast cake (not to be confused with Frankfurter Kranz). You can fill the dough with any filling you like and braid it using the same technique. This particular version, made from a recipe from pastry chef Karin Goren is filled with Nutella and bits of halva - a middle-eastern treat made from sesame. However, if you can't get your hands on halva, just nutella will work as well.
The result is a firm, warm, fragrant cake, filled with gooey delicious chocolatey goodness.

For the gluten free version (which you see in the picture) I simply substituted the regular flour with the same weight of Cup4Cup gluten free flour, and it worked fabulously well. Easy to work with and delicious. I did have to add a tiny bit more milk to the dough to get it to mix, but other than that it was the same recipe. Since this is the third recipe I've published with this flour, I think I should make it clear that of course I am not an advertiser for the flour nor do I have any connections with C4C or its manufacturers. I've just been finding it a really great flour to work with. 


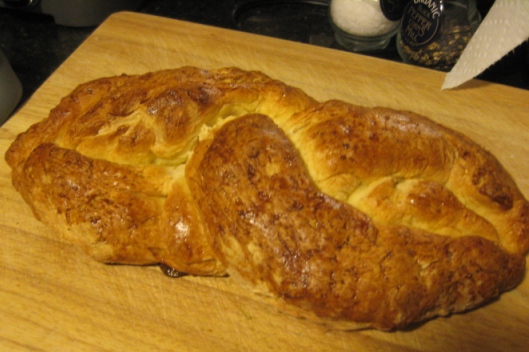
Krantz (yeast cake) with Nutella and Halva Filling 


Ingredients (for 2 cakes, each made in a small loaf pan or  "English cake" tin): 

For the dough:
- 500 grams/17 oz all purpose flour (or cup4cup gluten free flour)
- 1 tbsp active dry yeast
- 100 grams/3.5 oz/6 tbsp butter
- 150 ml (a little over 1/2 cup) milk
- 2 eggs, room temperature
- 6 tbsp sugar
- 1/2 tsp salt

For the filling: 
- 1 cup nutella
- 100 grams/3.5 oz halva ( In the US, Joyva makes gluten free halva)

- 1 egg, whisked, for egg wash

Preparation: 

1. In a mixer with a dough hook, combine the flour with the yeast. Melt the butter, allow to chill a bit, and add to the flour together with the milk, eggs and sugar. Mix in medium speed until you get a dough (if necessary, add a bit more milk). Add the salt, and keep working the dough in the mixer for another five minutes, until you get a smooth, shiny and slightly sticky dough. (Note: you can do all this by hand if you don't have a mixer)

2. Cover the bowl with plastic wrap, and leave the dough to rise in a warm place for a couple of hours, until doubled - or overnight in the fridge.

3. Divide the risen dough into two equal parts. Roll each dough into a rectangle about 1/2 cm/1/4 inch thick. Spread each rectangle with half of the Nutella spread and then sprinkle with half of the halva. Roll each rectangle into a roulade.

4. Slice one roulade down the middle, so that you get two lengths of dough layered with filling. Carefully turn the two pieces on their side, so that the part with the exposed filling is on top. Press one end of the two pieces together and then gently "braid" them (you can see the picture of this  here ). Do this for the other roulade, and gently transfer each one of them into a small loaf tin or long cake tin.

5. Allow the cakes to rise until about doubled. Gently brush with egg wash. Preheat oven to 180 C/350 F. Bake for about 25-30 minutes, until the cakes are fragrant and beautifully browned. If you gently knock on the dough, the cake will make a hollow sound. 

These are best served slightly warm, but are also delicious cold.


Tuesday, November 22, 2011

Butternut Squash and Sweet Potato Lasagna

While this recipe may sound similar to the pumpkin and goat cheese lasagna I posted a few months ago, it actually has quite a different flavor and texture. It's less creamy and rich and more vibrant  - and just as delicious.

The picture does not quite do this justice (it's so hard to take a pretty picture of lasagna!) but it really is quite a nice recipe. Make sure you don't overdo the cheese, because the mascarpone already contributed a fair amount of far and cheesiness to the mix.

Butternut Squash and Sweet Potato Lasagna 


 Ingredients (for 3-4 entree sized portions, or 1 lasagna dish 8'x8', 20x20 cm): 

- 1 pack of lasagna noodles, of the kind you don't need to precook (you may not need the whole pack, but better safe than sorry). 
- 1/2 medium butternut squash, cut into small cubes (You can replace this with some butternut squash puree)
- 2 medium sweet potatoes, cubed (You can replace this with some sweet potato puree) 
- 12 oz/340 grams of mascarpone or ricotta cheese
- 3 tbsp (15 grams) butter
- 1 small onion, finely chopped
- 3 cloves of garlic, minced
- 1 1/2 cup of freshly grated parmesan 
- 1/2 cup shredded mozzarella 
- salt, pepper to taste 
- a bit of olive oil for drizzling or olive oil spray 
 Preparation: 

1. Prepare the orange filling: Preheat oven to 350 F/175 C. Place the squash and potato cubes on a baking tin. Spray or drizzle with olive oil and sprinkle with salt and pepper. Toss to coat in the oil and seasoning. Bake in the oven for about 40-50 minutes, until the cubes are quite tender. Allow to cool and then mash with a fork or handheld blender into a smooth mash. (If you are using purees, combine the potato and squash purees with each other and season slightly). Leave the oven warm.

2. Prepare the mascarpone filling: Melt the butter in a small skillet over low-medium heat. Add the onion and garlic and cook for a few minutes, until they are soft and fragrant. In a bowl combine the mascarpone or ricotta, the butter/onion mixture and 3/4 cups of the parmesan until relatively smooth and spreadable. Season with salt and pepper. 

3. Build your lasagna: spray a small lasagna pan (see sizes above) with a bit of nonstick spray. Spread a few tablespoons of the squash filling onto the pan (not too much, just to wet it a bit) and cover with lasagna noodles. Top the noodles with half of the remaining squash puree and spread (you may need to use your fingers to get good coverage here). Top with half of the mascarpone mixture and spread. Make sure the noodles are well covered. Top with half of the remaining parmesan and half of the mozzarella. Cover this with another layer of lasagna noodles, then top with the remaining squash, remaining mascarpone, and remaining shredded cheeses. Again, make sure the noodles are fully covered, or they will be crunchy. Bake for about 45 minutes, or until the cheese on top is golden and bubbly. 

Enjoy!
 

Friday, November 11, 2011

Challah (with GF option)

Making challah is really one of things that I like doing when I'm feeling a bit homesick or want to really feel like it's Friday. There's nothing like having the whole house smell of baking, and then get that beautiful golden loaf out of the oven. And if there are any leftovers, they also make the best french toast.  My favorite challahs are the ones that aren't particularly sweet, so this recipe is for a not-very-sweet challah.

The joy of baking challah is something I've mostly given up since celiac entered our lives, because messing around with all that flour is not a great idea. There is the GF challah recipe I posted on Rosh Hashana. However, it's complicated and the results, while decent, are not quite satisfying enough. Then this week I saw that Cup4Cup flour (the new flour I mentioned in a recent post) published a recipe for bagels that looked really easy and convincing. I gave it a try and was pretty happy with the results. I therefore decided that it was time to put this flour to the ultimate test: would it really work when used, cup for cup, instead of regular flour, in a regular recipe, for bread?!?
Most gluten free flours would fail this test outright. However, C4C actually did pretty well. The challah you see in the picture is, in fact, entirely gluten free. The dough behaved almost exactly like gluteny dough and was easy to work with. The result is not quite as fluffy and wonderful as regular fresh challah, but it's pretty darn close as a substitute! Overall, C4C deserves outstanding marks as a GF flour that really works.

So here is the Challah recipe, in it's regular, non-GF version, which can also be made GF using Cup4Cup flour.NOTE that the recipe does require quite a long rising and baking time, so don't make this at the last minute.

Challah


Ingredients (for one large challah loaf): 

- 1.25 cup warm water 
- 1.5 tsp active dry yeast 
- 1/4 cup of honey 
- 2 tbsp vegetable oil 
- 1 egg + extra for eggwash
- 1.5 tsp salt
- 4 cups all purpose flour (or GF Cup4Cup flour) + extra for flouring

Preparation: 

1. Pour the warm water into a large bowl. Sprinkle the yeast over the water. Add the honey, oil, egg and salt. Mix well. Gradually add in the flour, mixing as you go along (you can also use a mixer with dough hook for this). When the flour is incorporated, knead until you get a smooth dough that no longer feels sticky (if you are making the GF version, there's not much point in a lot of kneading, since there is no gluten to develop. Just knead it a bit until it feels like a cohesive dough that isn't too sticky). Cover the bowl with a clean damp kitchen towel and allow to rise for 1.5 hours. 

2. Punch down the risen dough and put on a floured surface (for GF dough you may need a bit more flour, if it feels a bit stick). Knead the dough for about five minutes (again, if you are using GF, just knead it a bit until it is easy to work with). Divide the dough into three equal parts, shape each part into a long snake, attach the three snakes at one end and then braid them. Oil a baking tin or cover it with parchment paper, and put the challah on the tin. if your challah looks a bit bumpy - which can happen especially with the GF dough, moisten your hands a bit with water and gently rub the challah with moistened hands to smooth it up a bit.   Cover with a damp kitchen towel and allow to rise for another hour. 

3. Preheat oven to 375 F/180 C. Brush the challah with egg. Bake for about 30-40 minutes, until the challah is golden-brown and makes a hollow sound when you knock on the bottom of it.  


Enjoy!

Mont Blanc (Meringue with chestnut cream)

This elegant dessert looks complicated, but it is actually quite simple to make. It consists of a meringue "bowl" topped with a rich yet fluffy chestnut cream. It is named, of course, after the mountain. I made it based on this recipe.


Mont Blanc


Ingredients (for six portions): 

For the Meringue: 
- 4 egg whites (I had trouble using boxed egg whites for this. They wouldn't fluff up.)
- 1 cup of sugar

For the cream:
- 150 grams (about 5-6 oz) peeled and cooked chestnuts (you can buy them in jars or vacuum sealed)
- 2/3 cup sugar
- 3/4 cup milk
- 250 ml (about 8 oz) whipping/heavy cream

- Crushed nuts or cocoa nibs, to decorate (optional)

Preparation: 

1. Make the meringue: in  a mixer, beat the egg whites until they form a soft foam. While beating, gradually add the sugar and continue beating until you get a very stiff foam with a nice glossy sheen to it.

2. Heat oven to 120 C/220 F. Line a baking sheet with parchment paper. Using a piping tool or just a spoon, create at least six small meringue "bowls" on the baking sheet. (I found that the easiest way to do this was to dump a heaping spoonful of meringue on the sheet, and then carefully use clean fingers in order to push the meringue open to create a bowl-like shape).  Bake the meringue in the oven for at least two hours, or until the bowls easily separate from the bottom of the baking parchment. Turn off the oven, and leave the meringues to cool inside it (this will take a few hours). Set aside. (You can put them in an airtight container and keep them outside the fridge for a few days). You can also just create one large meringue bowl.

3. Meanwhile, prepare the cream. In a medium pot, place the chestnuts, sugar and milk. Bring to a low boil, turn the heat down to a low heat, and simmer for about five minutes, stirring occasionally. Remove from heat and allow to cool a bit. Transfer to a blender or food processor and process until smooth. (You can try using an immersion/stick blender for this, but I couldn't get the desired smoothness that way).  Refrigerate until completely cool.

4. Whip the heavy cream until you get a stiff whipped cream. Gently fold the chestnut mixture into it. You will get a cream that has a slightly brownish color, but is mostly white. Chill until you are ready to serve.

5. Right before serving, place a meringue bowl on a each plate. Pipe or simply spoon the cream unto the bowl. Decorate with nuts or cocoa nibs and serve immediately.

Tuesday, November 8, 2011

Baked Creamy Tomato Gnocchi

With winter making an early appearance this year, I was craving something rich, creamy and soothing. I suddenly remembered a dish served in one of our local restaurants, which consists of gnocchi in a pink sauce, topped with mozzarella and then baked until the cheese is melted and bubbly.  This dish would be particularly great served to guests in individual serving dishes, but works well family style as well.

Because I was in a hurry, I used store-bought sugo rosa sauce for this, but I give here my usual recipe for pink sauce (which can also easily be used as regular tomato sauce by removing the cream). You can choose to use ready sauce if you want to save time.

Baked Creamy Tomato Gnocchi


Ingredients (for 3-4 portions): 

- 1/2 onion, finely diced. 
- 1-2 tsp of olive oil 
- 1 large can of crushed tomatoes (NOT tomato paste/tomato sauce/peeled tomatoes) 
- Seasoning: salt, pepper, garlic powder, oregano, chilli powder
- Herbs (optional): basil, oregano, parsley, fine chopped
- about 1/2 cup of light or heavy cream (or to taste) 
[You can replace all of the above with some prepared pink pasta sauce]

- 500 grams/1 lbs gnocchi - frozen or dry (you can use GF gnocchi for this).

- 1-2 handfuls of shredded mozzarella cheese

Preparation: 

1. Set a pot of water boiling for the gnocchi. Preheat oven to 425 F/220 C, or prepare the broiler.
2. In a separate pot or deep pan, heat the olive oil and sautee the onion until soft and golden. Add the the crushed tomatoes. Season to taste with the spices. When the tomatoes are warmed through, add the herbs (if you are using them), and then stir in the cream. Use as much or as little cream as you like to get the right color of sauce to your liking). Remove from heat. 

3. Add the gnocchi to the boiling water. Cook according to instructions until they are ready (usually the gnocchi will float). Drain. Put the gnocchi back in the pot. Slowly begin adding some of the pink sauce to the gnocchi. Add  just enough to make sure that they are fully coated + a bit extra (but you don't want the dish to be very liquid). If you have sauce left over, just store it in the fridge in a sealed container and use within a few days. 

4. Spread the saucy gnocchi into an oven safe dish (ideally, one that is broiler-safe would be best, but you can make due without it). Sprinkle shredded mozzarella (as much or as little as you want) over the top of the dish. If you are using a broiler safe dish, place the dish under the broiler for a few minutes, until the cheese is golden and bubbly. If you do not have a broiler or an appropriate dish, bake the dish in the oven for about 10-15 minutes, until the cheese is melted and bubbly (it won't get as lovely a golden-brown shade without a broiler). 


Cheddar Garlic Biscuits

These are absolutely delicious, rich and garlicky gluten free biscuits, made using Betty Crocker's GF Bisquick. You can probably make them just as easily using regular Bisquick or another biscuit mix for a non-GF version. The recipe is from here . After they are baked, the biscuits are topped with a garlic butter, that makes them moister and adds an extra garlicky oomph.

After baking, you can cool the biscuits off a bit and then freeze them. They then reheat very well.

Cheddar Garlic Biscuits 


Ingredients (for 10 large biscuits): 

- 2 cups Gluten Free Bisquick  
- 1/4 tsp garlic powder
- 1/4 cup (half a stick) butter, firm 
- 2/3 cup milk
- 1/2 cup shredded cheddar cheese
- 3 eggs

For topping: 
- 1/4 cup (half a stick) butter, melted
- 1/4 tsp garlic powder
- 1/4 tsp paprika (my addition)

Preparation: 

1. Heat oven to 425 F/ 220 C. Prepare a baking tin (if you like, you can line it with baking parchment, but make sure it is the kind that can withstand high heats). In a bowl  (or in the bowl of your food processor) combine the biscuit mix and the garlic. 

2. Using a food processor or a fork, "cut" the butter into the flour mix until you get coarse crumbs. Stir/process in the milk, cheese and eggs, until a soft dough forms.

3. Drop 10 heaping spoonfuls of the dough onto the baking sheet. Bake 8-10 minutes until golden brown.

4. In a bowl combine the melted butter, the garlic and the paprika for the topping. When the biscuits are still warm, brush each biscuit with the butter. Serve warm.